July 16, 2026
Steps to making a 'Contact Us' page

Building a Simple Flask Contact Form as a Beginner
When learning backend development, it always helps to start with something small, but useful. That is why a Contact Form is a good starting point because it teaches you all the basic requirements needed to develop your coding skills.
In this project, I will be using Flask to build a Contact form. The user types a subject and message, then submits the form, where the backend saves the message by putting it into a JSON file, and after submitting, the user will see a thank-you page.
This project will help teach you how routes work, how to handle form submissions, and how to store data in a simple file.
Alternatives to Flask and JSON
If you want to explore other tools, here are some beginner-friendly options:
Django: a full web framework with built-in features (Alternative to Flask)
FastAPI: great for APIs and modern Python projects (Alternative to Flask)
Express.js: JavaScript version of Flask (Alternative to Flask)
SQLite: a simple file-based database (Alternative to JSON)
MySQL/PostgreSQL: full databases for bigger projects (Alternative to JSON)
MongoDB: stores data in JSON-like documents (Alternative to JSON)
--------------------------------------------------------------------------------------------------------------
Building the Backend
Flask is a lightweight Python framework that makes it easy to create web routes. In this project, I used two main routes:
The home route, which shows the contact form.
The submit route, which receives the form data and saves it.
When the user submits the form, Flask collects the subject and message, creates a dictionary, and adds it to a list. That list is then written into a JSON file so the messages are saved permanently.
If the JSON file is empty or missing, the code creates a new list so the app doesn't crash.
--------------------------------------------------------------------------------------------------------------
Building the Frontend
The frontend uses two HTML templates:
contact.html
thankyou.html
The contact page contains the form. The thank-you page confirms that the message was submitted successfully.
--------------------------------------------------------------------------------------------------------------
JSON File
Instead of using a database, this project stores messages in a JSON file. JSON is easy to read and perfect for small projects.
Every time a user submits the form, a new entry is added to the list inside the JSON file.
This creates a simple log of all submissions.
--------------------------------------------------------------------------------------------------------------
Process of Creating the Contact Form
Stage 1:
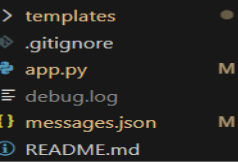
Create a new folder named ContactUs. Inside it, add the following files and folders:
app.py
messages.json
a folder named templates
Screenshot to include: Show your VS Code sidebar or file explorer with the ContactUs folder open, displaying app.py, messages.json, and the templates folder.
Stage 2:
Create the Contact and Thank-You message form Template:
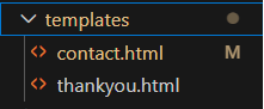
Inside the templates folder, create a file named contact.html. Add the HTML form with two fields: subject and message. Add a submit button so the user can send the form.
Inside the templates folder, create thankyou.html. Add a simple message confirming that the form was submitted successfully.
Stage 3:
Build the flask Backend:
Open app.py and set up two routes:
A route that displays the contact form
A route that handles form submission
In the submission route, collect the subject and message from the form and return the thank-you page.
(I will attach the code you can paste at the end of this article)
Stage 4:
Add JSON storage:
Open messages.json and make sure it contains an empty list. In app.py, load the JSON file, append each new message, and write the updated list back to the file.
Stage 5:
Activate your virtual environment, install Flask, and run the server using python app.py. Open the browser at http://127.0.0.1:5000. Submit a test message and check that the thank-you page appears.
--------------------------------------------------------------------------------------------------------------
Content of Files:
Contact.html:
<!DOCTYPE html>
<html>
<head>
<title>Contact Us</title>
<style>
body {
font-family: Arial, sans-serif;
max-width: 600px;
margin: 40px auto;
padding: 20px;
}
h1 {
text-align: center;
}
label {
font-weight: bold;
margin-top: 15px;
display: block;
}
input, textarea {
width: 100%;
padding: 10px;
margin-top: 5px;
border-radius: 5px;
border: 1px solid #ccc;
font-size: 16px;
}
button {
margin-top: 20px;
padding: 12px;
width: 100%;
background-color: #0078ff;
color: white;
border: none;
border-radius: 5px;
font-size: 18px;
cursor: pointer;
}
button:hover {
background-color: #005fcc;
}
.error {
color: red;
margin-top: 10px;
font-weight: bold;
}
</style>
</head>
<body>
<h1>Contact Us</h1>
{% if error %}
<p class="error">{{ error }}</p>
{% endif %}
<form action="/submit" method="POST">
<label for="subject">Subject</label>
<input type="text" id="subject" name="subject" placeholder="Enter the subject">
<label for="message">Your Message</label>
<textarea id="message" name="message" rows="6" placeholder="Enter your message"></textarea>
<button type="submit">Submit</button>
</form>
</body>
</html>
thankyou.hmtl:
<!DOCTYPE html>
<html>
<head>
<title>Thank You</title>
<style>
body {
font-family: Arial, sans-serif;
max-width: 600px;
margin: 40px auto;
padding: 20px;
text-align: center;
}
h1 {
color: #0078ff;
}
p {
font-size: 18px;
margin-top: 20px;
}
a {
display: inline-block;
margin-top: 30px;
padding: 10px 20px;
background-color: #0078ff;
color: white;
text-decoration: none;
border-radius: 5px;
}
a:hover {
background-color: #005fcc;
}
</style>
</head>
<body>
<h1>Thank You!</h1>
<p>Your message has been received. We’ll get back to you as soon as possible.</p>
<a href="/">Return to Contact Form</a>
</body>
</html>
app.py:
from flask import Flask, render_template, request
import json
import os
app = Flask(__name__)
# Load existing messages or create an empty list
if os.path.exists("messages.json"):
with open("messages.json", "r") as f:
messages = json.load(f)
else:
messages = []
@app.route("/form", methods=["GET"])
def contact_form():
return render_template("contact.html")
@app.route("/submit", methods=["POST"])
def submit_form():
subject = request.form.get("subject")
message = request.form.get("message")
# log the received data for debugging into a log file
with open("debug.log", "a") as log_file:
log_file.write(f"Received subject: {subject}, message: {message}\n")
# Validation
if not subject:
return render_template("contact.html", error="Subject cannot be empty.")
elif not message:
return render_template("contact.html", error="Message cannot be empty.")
# Save the message
new_entry = {"subject": subject, "message": message}
messages.append(new_entry)
with open("messages.json", "w") as f:
json.dump(messages, f, indent=4)
return render_template("thankyou.html")
if __name__ == "__main__":
app.run(debug=True)
messages.json:
[]
490 views